Difference between revisions of "Connectivity"
Caspernight (talk | contribs) |
|||
| (23 intermediate revisions by 7 users not shown) | |||
| Line 1: | Line 1: | ||
| − | + | DOSBox networking works in a client-server architecture, where one machine acts as a server and all the others connect to it as its clients. DOSBox emulates outdated protocols and actually routes them to Internet's own IP protocol (TCP/IP for serial/modem emulation and the even better UDP/IP for IPX emulation). | |
| − | |||
| − | + | == IPX emulation == | |
| + | First, [[Dosbox.conf#%5Bipx%5D|enable IPX]]. | ||
| + | === Start IPX server === | ||
| − | + | Power on DOSBox on all the computers that you want to participate in the LAN games. One of these computers will have to act as a server. The rest will be clients. | |
| + | On the server machine, execute the following command: | ||
| − | + | ipxnet startserver [UDP port] | |
| + | See screenshot below: | ||
| − | + | [[Image:dosbox_lan_02.png]] | |
| − | + | UDP port is optional. Otherwise it defaults to 213 (the assigned IANA port for IPX tunnelling). If you want another port, for example, port 19900, type: | |
| + | ipxnet startserver 19900 | ||
| + | If you change the default, it's customary to choose something above 1024 as anything below is considered reserved. In Linux specifically, only root (or superuser) can use port numbers lower than 1024. | ||
| + | Whatever UDP port is chosen (including the default), '''it must be forwarded and open to the outside network if a server is hidden behind a router (NAT)'''. | ||
| − | == | + | === Start client(s) === |
| − | |||
| − | |||
| − | + | On each one of the clients, run the following command to connect to the server: | |
| − | + | ipxnet connect <IP> [UDP port] | |
| − | + | For example: | |
| − | + | ipxnet connect 192.168.2.100 | |
| + | See screenshot below: | ||
| − | + | [[Image:dosbox_lan_03.png]] | |
| − | + | Port is optional. The same rules apply as in [[#Start IPX server]]. For example: | |
| + | ipxnet connect 192.168.2.100 19900 | ||
| + | |||
| + | You now have the network running. You can confirm it by typing: | ||
| + | IPXNET STATUS | ||
| + | If you want to check the speed and/or see the list of server and all clients, type: | ||
| + | IPXNET PING | ||
| − | + | '''Start your game''' | |
| − | + | If you're done, but want to remain in DOSBox, the clients can optionally use the following commands: | |
| + | IPXNET DISCONNECT | ||
| + | and only after all clients disconnect (or you'll risk locking them up), the server can type: | ||
| + | IPXNET STOPSERVER | ||
| − | + | == Modem emulation== | |
| + | First, define [[Configuration:SerialPort]]. | ||
| − | + | If you change the default TCP port, it's customary to choose something above 1024 as anything below is considered reserved. In Linux specifically, only root (or superuser) can use port numbers lower than 1024. | |
| + | Whatever TCP port is chosen (including the default 5000), '''it must be forwarded and open to the outside network if a server is hidden behind a router (NAT)'''. | ||
| − | ''' | + | ===The game's modem options=== |
| + | You must enter the game's modem options and: | ||
| + | * Define the same COM number as you chose in DOSBox. If the game is hardcoded to a certain COM number, this must be the one you choose in DOSBox. | ||
| + | * Choose the highest modem's speed the game allows. | ||
| + | * <sup>''For [[#Emulating making a call|clients only]]''</sup> If there's an address book, you can define the server in advance. Actually, some games might refuse to call anyone that's not listed in advance in the address book. | ||
| + | * The game's other modem options don't matter in DOSBox. | ||
| − | + | Exit the settings, enter the game itself and find the call/answer menu entry. | |
| − | + | ====Emulating answering a call==== | |
| + | Some games may want you to define an auto-answer command in advance, while others may want you to answer manually when the call comes in. Some may allow both modes. | ||
| − | + | In the first mode, the server should choose the "wait for calls" option in their game. If the game wants you to type a manual command, use "ATS0=1" (answer on first call). | |
| − | + | In the second mode, the server should choose the "answer call" option when the game announces a call is coming in. If the game wants you to type a manual command, use "ATA". | |
| − | + | ====Emulating making a call==== | |
| + | The client should choose the "make a call" option in their game. Then supply the server's hostname or IP address. | ||
| − | + | If the game wants you to type a manual command, use "ATDT<IP>". For example, if the server is "hosty" <1.2.3.4>, type: | |
| + | ATDT1.2.3.4 | ||
| + | or "ATDT<HOST>". For example, in the case of "hosty": | ||
| + | ATDThosty | ||
| − | + | == How to obtain a computer's IP address== | |
| + | If connecting to others on the Internet, search for your [http://www.whatismyip.com/ external IP address] and make sure you forwarded the ports on your router to your computer. | ||
| − | + | If on a LAN (local network): | |
| − | + | On GNU/Linux: | |
| + | ifconfig | ||
| − | + | On Mac: Press Cmd-Space, type network, press enter, and select the connection. The IP address is to the right. | |
| − | |||
| − | + | ===Windows=== | |
| − | Go to "My Network | + | Go to "My Network Places" |
Click on "View My Network Connections" | Click on "View My Network Connections" | ||
| + | |||
[[Image:Network_settings1.png]] | [[Image:Network_settings1.png]] | ||
| − | Right Click the Network that you are using | + | Right Click the Network that you are using and choose "Status", then, you will be able to obtain the computer's IP address in a local network. |
| − | and choose "Status", then, you will be able to obtain the IP address | + | |
[[Image:Network_settings2.png]] | [[Image:Network_settings2.png]] | ||
| + | |||
| + | ==Dedicated server== | ||
| + | |||
| + | You may wish to run a public facing dedicated server, doing this will allow multiple clients (e.g. players behind NAT on their respective broadband connections) to connect outbound to your server and thus see each others games without needing to port forward. | ||
| + | |||
| + | Several implementations exist... | ||
| + | |||
| + | ====A Linux version by Michał Siejak (MasterM)==== | ||
| + | * http://www.vogons.org/viewtopic.php?t=22994#p171180 | ||
| + | * http://www.youtube.com/watch?v=uy-a0PzCw1E | ||
| + | * http://github.com/intangir/ipxnet | ||
| + | |||
| + | ====A Perl version by Alexander Clouter (diGriz)==== | ||
| + | * http://www.vogons.org/viewtopic.php?t=22994#p179078 | ||
| + | * http://github.com/steveschnepp/ipxserver | ||
| + | |||
| + | ====A Java version by Ralf Grillenberger (H-A-L-9000)==== | ||
| + | * http://www.vogons.org/viewtopic.php?t=22994#p171196 | ||
| + | * http://home.arcor.de/h-a-l-9000/tunnelserver.html | ||
| + | |||
| + | ====A Windows version by Joe Petrie (CodeJunkie)==== | ||
| + | * http://www.vogons.org/viewtopic.php?t=22994#p185381 | ||
| + | * http://www.classicgamingarena.com/downloads | ||
| + | |||
| + | ====A Linux and Windows version by Hans Peter Anvin (hpa)==== | ||
| + | * http://www.vogons.org/viewtopic.php?t=22994&start=20#p209067 | ||
| + | * http://git.zytor.com/games/dosbox/ipxrelay.git/ | ||
| + | |||
| + | ==External links== | ||
| + | * [http://www.dedoimedo.com/games/reviving/dosbox_multiplayer.html dedoimedo.com] (the original article plus screenshots from actual multiplayer games) | ||
Latest revision as of 23:22, 9 April 2016
DOSBox networking works in a client-server architecture, where one machine acts as a server and all the others connect to it as its clients. DOSBox emulates outdated protocols and actually routes them to Internet's own IP protocol (TCP/IP for serial/modem emulation and the even better UDP/IP for IPX emulation).
IPX emulation
First, enable IPX.
Start IPX server
Power on DOSBox on all the computers that you want to participate in the LAN games. One of these computers will have to act as a server. The rest will be clients.
On the server machine, execute the following command:
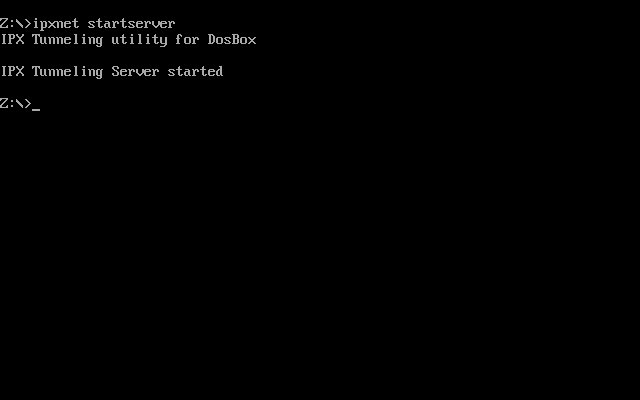
ipxnet startserver [UDP port]
See screenshot below:
UDP port is optional. Otherwise it defaults to 213 (the assigned IANA port for IPX tunnelling). If you want another port, for example, port 19900, type:
ipxnet startserver 19900
If you change the default, it's customary to choose something above 1024 as anything below is considered reserved. In Linux specifically, only root (or superuser) can use port numbers lower than 1024.
Whatever UDP port is chosen (including the default), it must be forwarded and open to the outside network if a server is hidden behind a router (NAT).
Start client(s)
On each one of the clients, run the following command to connect to the server:
ipxnet connect <IP> [UDP port]
For example:
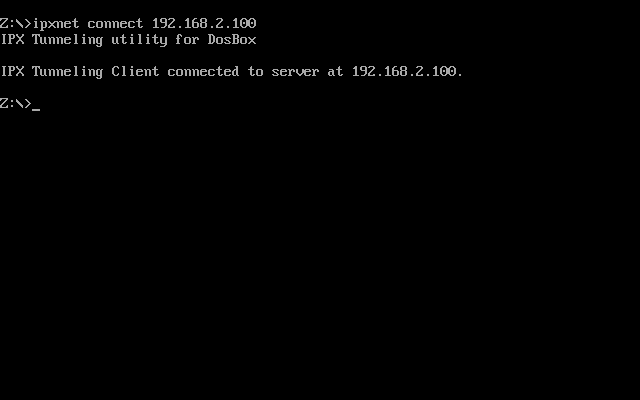
ipxnet connect 192.168.2.100
See screenshot below:
Port is optional. The same rules apply as in #Start IPX server. For example:
ipxnet connect 192.168.2.100 19900
You now have the network running. You can confirm it by typing:
IPXNET STATUS
If you want to check the speed and/or see the list of server and all clients, type:
IPXNET PING
Start your game
If you're done, but want to remain in DOSBox, the clients can optionally use the following commands:
IPXNET DISCONNECT
and only after all clients disconnect (or you'll risk locking them up), the server can type:
IPXNET STOPSERVER
Modem emulation
First, define Configuration:SerialPort.
If you change the default TCP port, it's customary to choose something above 1024 as anything below is considered reserved. In Linux specifically, only root (or superuser) can use port numbers lower than 1024.
Whatever TCP port is chosen (including the default 5000), it must be forwarded and open to the outside network if a server is hidden behind a router (NAT).
The game's modem options
You must enter the game's modem options and:
- Define the same COM number as you chose in DOSBox. If the game is hardcoded to a certain COM number, this must be the one you choose in DOSBox.
- Choose the highest modem's speed the game allows.
- For clients only If there's an address book, you can define the server in advance. Actually, some games might refuse to call anyone that's not listed in advance in the address book.
- The game's other modem options don't matter in DOSBox.
Exit the settings, enter the game itself and find the call/answer menu entry.
Emulating answering a call
Some games may want you to define an auto-answer command in advance, while others may want you to answer manually when the call comes in. Some may allow both modes.
In the first mode, the server should choose the "wait for calls" option in their game. If the game wants you to type a manual command, use "ATS0=1" (answer on first call).
In the second mode, the server should choose the "answer call" option when the game announces a call is coming in. If the game wants you to type a manual command, use "ATA".
Emulating making a call
The client should choose the "make a call" option in their game. Then supply the server's hostname or IP address.
If the game wants you to type a manual command, use "ATDT<IP>". For example, if the server is "hosty" <1.2.3.4>, type:
ATDT1.2.3.4
or "ATDT<HOST>". For example, in the case of "hosty":
ATDThosty
How to obtain a computer's IP address
If connecting to others on the Internet, search for your external IP address and make sure you forwarded the ports on your router to your computer.
If on a LAN (local network):
On GNU/Linux:
ifconfig
On Mac: Press Cmd-Space, type network, press enter, and select the connection. The IP address is to the right.
Windows
Go to "My Network Places"
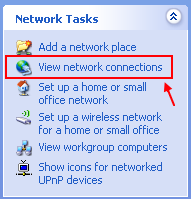
Click on "View My Network Connections"
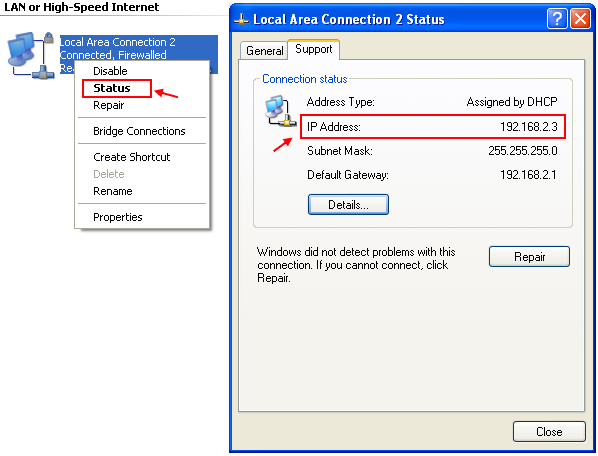
Right Click the Network that you are using and choose "Status", then, you will be able to obtain the computer's IP address in a local network.
Dedicated server
You may wish to run a public facing dedicated server, doing this will allow multiple clients (e.g. players behind NAT on their respective broadband connections) to connect outbound to your server and thus see each others games without needing to port forward.
Several implementations exist...
A Linux version by Michał Siejak (MasterM)
- http://www.vogons.org/viewtopic.php?t=22994#p171180
- http://www.youtube.com/watch?v=uy-a0PzCw1E
- http://github.com/intangir/ipxnet
A Perl version by Alexander Clouter (diGriz)
A Java version by Ralf Grillenberger (H-A-L-9000)
- http://www.vogons.org/viewtopic.php?t=22994#p171196
- http://home.arcor.de/h-a-l-9000/tunnelserver.html
A Windows version by Joe Petrie (CodeJunkie)
A Linux and Windows version by Hans Peter Anvin (hpa)
- http://www.vogons.org/viewtopic.php?t=22994&start=20#p209067
- http://git.zytor.com/games/dosbox/ipxrelay.git/
External links
- dedoimedo.com (the original article plus screenshots from actual multiplayer games)


